
Hooking .NET Functions with Profilers
Published: 25/10/2025
In my spare time I’ve been working on a security tool to assist with detecting malicious activity on Microsoft IIS servers. So far my tool can monitor all request and response content so monitoring basic webshells isn’t an issue however when it came to more complex activities it leaves a bit to be desired.
So I set myself a goal, I wanted to gain visibility of several key .NET functions commonly used by web shells including:
evalwhich is used in CHOPPER style shells to evaluate JScript at runtimeAssembly.Loadwhich allows for complete .NET assemblies to be loaded and executed from memoryCompileAssemblyFromSourcewhich allows C# code to be compiled and executed at run time (I still have no idea why this exists)
On top of that, I wanted be able to tie the usage of any of these functions back to the IIS request which triggered the function call (this may sound like an arbitrary addition but it does break some methods).
Anti Malware Scan Interface (AMSI)
My first idea was to go down the route many EDR providers use to gain visibility of .NET assembly loads, create an AMSI provider. If you’re not familiar with it, AMSI or the Anti-Malware Scan Interface, is a component of modern Windows systems which allows third party security providers to register to receive call backs when certain content is loaded/executed by various Microsoft technologies. For example, all PowerShell commands run on a modern Windows system are passed to any registered AMSI providers (Defender and any third party AV) prior to their execution. The part of AMSI we really care about though is its visibility of .NET assembly loads which was added in .NET Framework 4.8. The visibility AMSI provides us over .NET assembly loads is half decent, we get the process ID of the process loading the assembly, the SHA256 hash, size, the full contents of the assembly being loaded and…that’s it. Whilst this is pretty good from an EDR perspective where we generally only care about tying something back to a process, my goal was to be able to tie an assembly load back to an IIS request which wasn’t possible with this limited information. AMSI providers must also be registered system wide meaning my provider would be loaded into every process that requests an AMSI scan, even if I only care about IIS. And lastly, even if it provided me with the visibility I needed for Assembly.Load, it wouldn’t help me with monitoring any of the other functions I was interested in.
Thinking about the problem and what I actually wanted to achieve, I realised there was one option which would allow me to gain the visibility I needed, I needed to be able to hook the functions I was interested in. I had some prior experience with hooking functions from my research into using the Harmony game modding library to mess with IIS however injecting a game modding library into IIS didn’t feel like the greatest option so I looked how to manually hook managed functions.
Native Hooks
Before we get into how to hook a managed function, lets briefly cover how to hook a native function as the process is similar but far easier to explain with native hooks. Conceptually hooking is quite simple, we just override the first instruction of the function we want to hook with an unconditional jump to a function we control, in that function we then do whatever we want (typically log/mess with parameters) before jumping back to the original function to allow its execution.
Original Function        │   Original Function                Hook
┌─────────────────────┐  │  ┌─────────────────────┐          ┌─────────────────────┐
│ push rbp            │  │  │ jmp 0xDEADBEEF ─────│──────────│─> nop               │
│ mov rbp, rsp        │  │  │ mov rbp, rsp   <────│──┐       │   ; do stuff        │
│ sub rsp, 0x20       │  │  │ sub rsp, 0x20       │  │       │   ; e.g. log params │
│ xor eax, eax        │  │  │ xor eax, eax        │  │       │   jmp 0x11111111 ┐  │
│ ...                 │  │  │ ...                 │  └───────│──────────────────┘  │
└─────────────────────┘  │  └─────────────────────┘          └─────────────────────┘
In practice it’s slightly more complex. First, we can’t just overwrite the first instruction of our target function as it likely does something important, and second, instructions aren’t uniform in size, so to write our jump instruction, we may need to override three of four smaller instructions.
To work around this, we typically read the first n bytes of the target function (depending on the type of JMP operation we need) and save those for later use, then we overwrite the beginning of the function with a jump to our hook function.
In our hook, we can then do whatever we want, the stack will look exactly the same as it did for the original function so we can access/modify parameters and do pretty much anything we want, we just need to make sure the stack and registers are restored to their original state before continuing. At the end of our hook function, we need to jump to what is commonly called a trampoline. A trampoline is simple a “function” which contains the instructions we overwrote in the original function, followed by a jump back to the original function, just after the JMP we wrote.
 Original Function       │   Original Function                Hook                             Trampoline
┌─────────────────────┐  │  ┌─────────────────────┐          ┌─────────────────────┐          ┌─────────────────────┐
│ push rbp            │  │  │ jmp 0xDEADBEEF ─────│──────────│─> nop               │ ┌────────│─> push rbp          │
│ mov rbp, rsp        │  │  │ xor eax, eax   <────│──┐       │   ; do stuff        │ │        │   mov rbp, rsp      │
│ sub rsp, 0x20       │  │  │ nop                 │  │       │   ; e.g. log params │ │        │   sub rsp, 0x20     │
│ xor eax, eax        │  │  │ nop                 │  │       │   jmp 0x11111111 ───│─┘        │   jmp 0x22222222 ┐  │
│ ...                 │  │  │ ...                 │  │       │                     │        ┌─│──────────────────┘  │
└─────────────────────┘  │  └─────────────────────┘  │       └─────────────────────┘        │ └─────────────────────┘
                                                     └──────────────────────────────────────┘
If everything was done correctly, a call to our hooked function should now result in an immediate jump to our hook then a jump to our trampoline then a jump back to the original function before normal execution resumes. There’s a few more steps that go into getting hooking working correctly such as correctly calculating the the number of instructions overwritten but this basic description should be enough for us to get into
Managed Hooks
Hooking a managed function is quite similar to hooking a native function however it requires a few extra steps and has some limitations we need to work around. First off, we aren’t actually going to be hooking the managed function itself, we’ll be hooking the just in time (JIT) compiled form of the function (i.e. the native code generated from our managed function).
This means before we can hook our managed function, we need to ensure its been jitted down to native code. There’s two ways to ensure a function has been jitted, call it, or use RuntimeHelpers.PrepareMethod(). Calling may sound like the easier option but when you consider some functions you way want to hook requite complex arguments to be passed to them, using PrepareMethod() becomes a far more attractive option. To use PrepareMethod(), we need to acquire a reference to the target method’s MethodInfo via a bit of reflection. For the remainder of this post I’ll be focusing on hooking System.Reflection.Assembly.Load() but the techniques discussed should apply to any managed function.
Type targetMethodClass = typeof(Assembly);
MethodInfo target = targetMethodClass.GetMethod("Load", new[] { typeof(byte[]) });
With a reference to our target function acquired, we can pass it to PrepareMethod():
RuntimeHelpers.PrepareMethod(target.MethodHandle);At this point, we can guarantee the Assembly.Load method has been jitted and is ready to be hooked.
We’ll need to prepare two more functions before we’re ready to start hooking, both of which we will be writing ourselves. Function 1, which I’ll be referring to as the hook function, will be the function we are redirecting the hooked function to. This is where we’ll implement out hook logic (log/tamper with params etc). Function 2, which I’ll be referring to as our sacrificial function, will do nothing, it exists solely to be overwritten with our trampoline.
class HookTest {
	public static void SetupHooks(){
		Type targetMethodClass = typeof(Assembly);
		Type hookMethodClass = typeof(HookTest);
		Type trampolineMethodClass = typeof(HookTest);

		MethodInfo target = targetMethodClass.GetMethod("Load", new[] { typeof(byte[]) });
		MethodInfo hookHandler = hookMethodClass.GetMethod("Hook", BindingFlags.NonPublic | BindingFlags.Static, null, new[] { typeof(byte[]) }, null);
		MethodInfo trampoline = trampolineMethodClass.GetMethod("AssemblyLoadOrig", BindingFlags.NonPublic | BindingFlags.Static, null, new[] { typeof(byte[]) }, null);

		RuntimeHelpers.PrepareMethod(target.MethodHandle);
		RuntimeHelpers.PrepareMethod(hookHandler.MethodHandle);
		RuntimeHelpers.PrepareMethod(trampoline.MethodHandle);
	}

	// Hook function
	private static Assembly Hook(byte[] rawAssembly)
	{
	    Console.WriteLine("[HOOK] called");
	    var output = AssemblyLoadOrig(rawAssembly);
	    Console.WriteLine("[HOOK] " + output.FullName);
	    return output;
	}

	// Sacrificial function
	[MethodImpl(MethodImplOptions.NoInlining)]
	private static Assembly AssemblyLoadOrig(byte[] rawAssembly)
	{
	    System.Diagnostics.Trace.Assert(false);
	    throw new Exception("This doesn't matter");
	}
}
The above code has everything we need to prepare to hook the Assembly.Load function although it looks a little different to my description of native hooking, so what’s going on? Why do we have a sacrificial function rather than a trampoline function?
With our native hook we were overwriting the beginning of our target function with a jump to our hook function, then our hook function jumped to our trampoline function, which finally jumped back to our target function however when it comes to managed code, things work a bit different.
We’ll actually be hooking two functions. We’ll start by still overwriting the start of the target function with a jump to our hook function. Next, we’ll hook our sacrificial function, overwriting its beginning with a jump to our trampoline. Finally, in our hook function we’ll call our sacrificial function.
That’s all a bit confusing so lets describe what will actually happen when we call Assembly.Load. When a call enters Assembly.Load it will immediately jump to our hook function (Hook in the code above). At this point we have access to the raw parameters of the original function and can log/mess with them to our hearts content. When we’re done we need to call our sacrificial function (AssemblyLoadOrig in the code above) which will cause an immediate jump to our trampoline, executing the code overwritten by our initial jump before executing the remainder of the Assembly.Load function. We’re not quite done though as we called our sacrificial function after jumping to our hook function meaning we’ve added an extra stack frame so when Assembly.Load returns, it returns to our Hook function rather than the original caller. To finish up we need to return the output of our sacrificial function back to the original caller (after logging/messing with it of course)
So where as a native hook looks like this:
Caller --Call--> TargetFunction --JMP--> Hook --JMP--> Trampoline --JMP--> TargetFunction --RET--> Caller
A managed hook looks more like this:
Caller --Call--> TargetFunction --JMP--> Hook --Call--> Sacrificial --JMP--> Trampoline --JMP--> TargetFunction --RET--> Hook --RET--> Caller
With the descriptions and preparation work out of the way, how do we actually wire up a hook? Painfully…
Thankfully, I’m not the first to look into this and during my research I came across Satoshi Tanda’s GitHub repo which proposed a method for hooking managed functions which sounded exactly like what I was attempting.
Satoshi’s code was geared towards hooking AMSI under PowerShell but after stripping it back to the bare essentials, swapping everything out to hook the Assembly.Load function and making some modifications to allow the code to be loaded via a web shell for quick testing, I was ready to test.
Before we get into testing though, lets go through what this code actually does.
namespace HookingAssembly
{
    public class HookScanContent : Page
    {
        protected override void OnLoad(EventArgs e)
        {
            if (HttpContext.Current.Request.Params.AllKeys.Contains("load"))
            {
				Type targetMethodClass = typeof(Assembly);
	            Type hookMethodClass = typeof(HookScanContent);
	            Type trampolineMethodClass = typeof(HookScanContent);

	            MethodInfo target = targetMethodClass.GetMethod("Load", new[] { typeof(byte[]) });
	            MethodInfo hookHandler = hookMethodClass.GetMethod("Hook", BindingFlags.NonPublic | BindingFlags.Static, null, new[] { typeof(byte[]) }, null);
	            MethodInfo trampoline = trampolineMethodClass.GetMethod("AssemblyLoadOrig", BindingFlags.NonPublic | BindingFlags.Static, null, new[] { typeof(byte[]) }, null);

	            RuntimeHelpers.PrepareMethod(target.MethodHandle);
	            RuntimeHelpers.PrepareMethod(hookHandler.MethodHandle);
	            RuntimeHelpers.PrepareMethod(trampoline.MethodHandle);

	            IntPtr targetAddr = target.MethodHandle.GetFunctionPointer();
	            IntPtr hookHandlerAddr = hookHandler.MethodHandle.GetFunctionPointer();
	            IntPtr trampolineAddr = trampoline.MethodHandle.GetFunctionPointer();

                if (MinHook.InstallHook(targetAddr, hookHandlerAddr, trampolineAddr))
                    HttpContext.Current.Response.Write("Hook installed");
                else
                    HttpContext.Current.Response.Write("Failed to install hook");
                return;
            }
        }

        private static Assembly Hook(byte[] rawAssembly)
        {
            HttpContext.Current.Response.Write("[HOOK] called");
            var output = AssemblyLoadOrig(rawAssembly);
            HttpContext.Current.Response.Write("[HOOK] " + output.FullName);
            return output;
        }

        [MethodImpl(MethodImplOptions.NoInlining)]
        private static Assembly AssemblyLoadOrig(byte[] rawAssembly)
        {
            System.Diagnostics.Trace.Assert(false);
            throw new Exception("This doesn't matter");
        }
    }
}
We’ve already seen most of this so lets focus on the new code:
IntPtr targetAddr = target.MethodHandle.GetFunctionPointer();
IntPtr hookHandlerAddr = hookHandler.MethodHandle.GetFunctionPointer();
IntPtr trampolineAddr = trampoline.MethodHandle.GetFunctionPointer();

if (MinHook.InstallHook(targetAddr, hookHandlerAddr, trampolineAddr))
	HttpContext.Current.Response.Write("Hook installed");
else
	HttpContext.Current.Response.Write("Failed to install hook");
First we call MethodHandle.GetFunctionPointer() on each of our jitted functions to retrieve a pointer to the beginning of the jitted function in memory.
Satoshi’s code uses MiniHook to perform the actual hooking operation which keeps things nice and neat. InstallHook is a wrapper around MiniHook’s MH_Initialize, MH_CreateHook and MH_EnableHook functions and is responsible for starting the hooking engine, then wiring the target, hook and sacrificial functions together.
After compiling the above code, dropping the resulting DLL in C:\inetpub\wwwroot\bin and creating an ASPX file called hook.aspx with the following contents, we’re ready to test.
<%@ Page Language="C#" CodeBehind="HookingAssembly.dll" Inherits="HookingAssembly.HookScanContent" %>We’ll start by sending a request to hook.aspx with a parameter of load=true which will cause our hook to be installed.

At this point, the Assembly.Load function should be wired up to our Hook function, all that’s left to do is test it with a basic reflection webshell.

Perfect! We can see the central line begins with [HOOK] called which is at the beginning of our Hook function, followed by [HOOK] System.Web.Export, Version=4.0.0.0, Culture=neutral, PublicKeyToken=6bc2fa89b6dbebe6 which is the FullName of the assembly that was just loaded, our managed hook is working perfectly!
At this point I was pretty excited, I’d spent days trying to get this working so seeing that console output was an amazing feeling. However, IIS is a complex beast and there was an edge case I needed to test, how does this work when multiple sites are hosted under the same IIS worker process?
So I created another site on my IIS server and configured it to run under the same IIS worker as the one we just deployed a hook under (but under a different port), then sent a similar request:

And the entire process died. So what’s going on?
IIS’ worker process w3wp.exe will create a new application domain for each site its handling, along with a few default and a shared application domain (we’ll ignore the system domain as its empty).
Getting into application domains is a bit much for this post so lets just say they they provide a basic mechanism for separating related .NET assemblies into their own space based on some criteria (in this case, which site they were loaded under).
Lets take a look at this screenshot from System Informer which shows my server just before its crash.
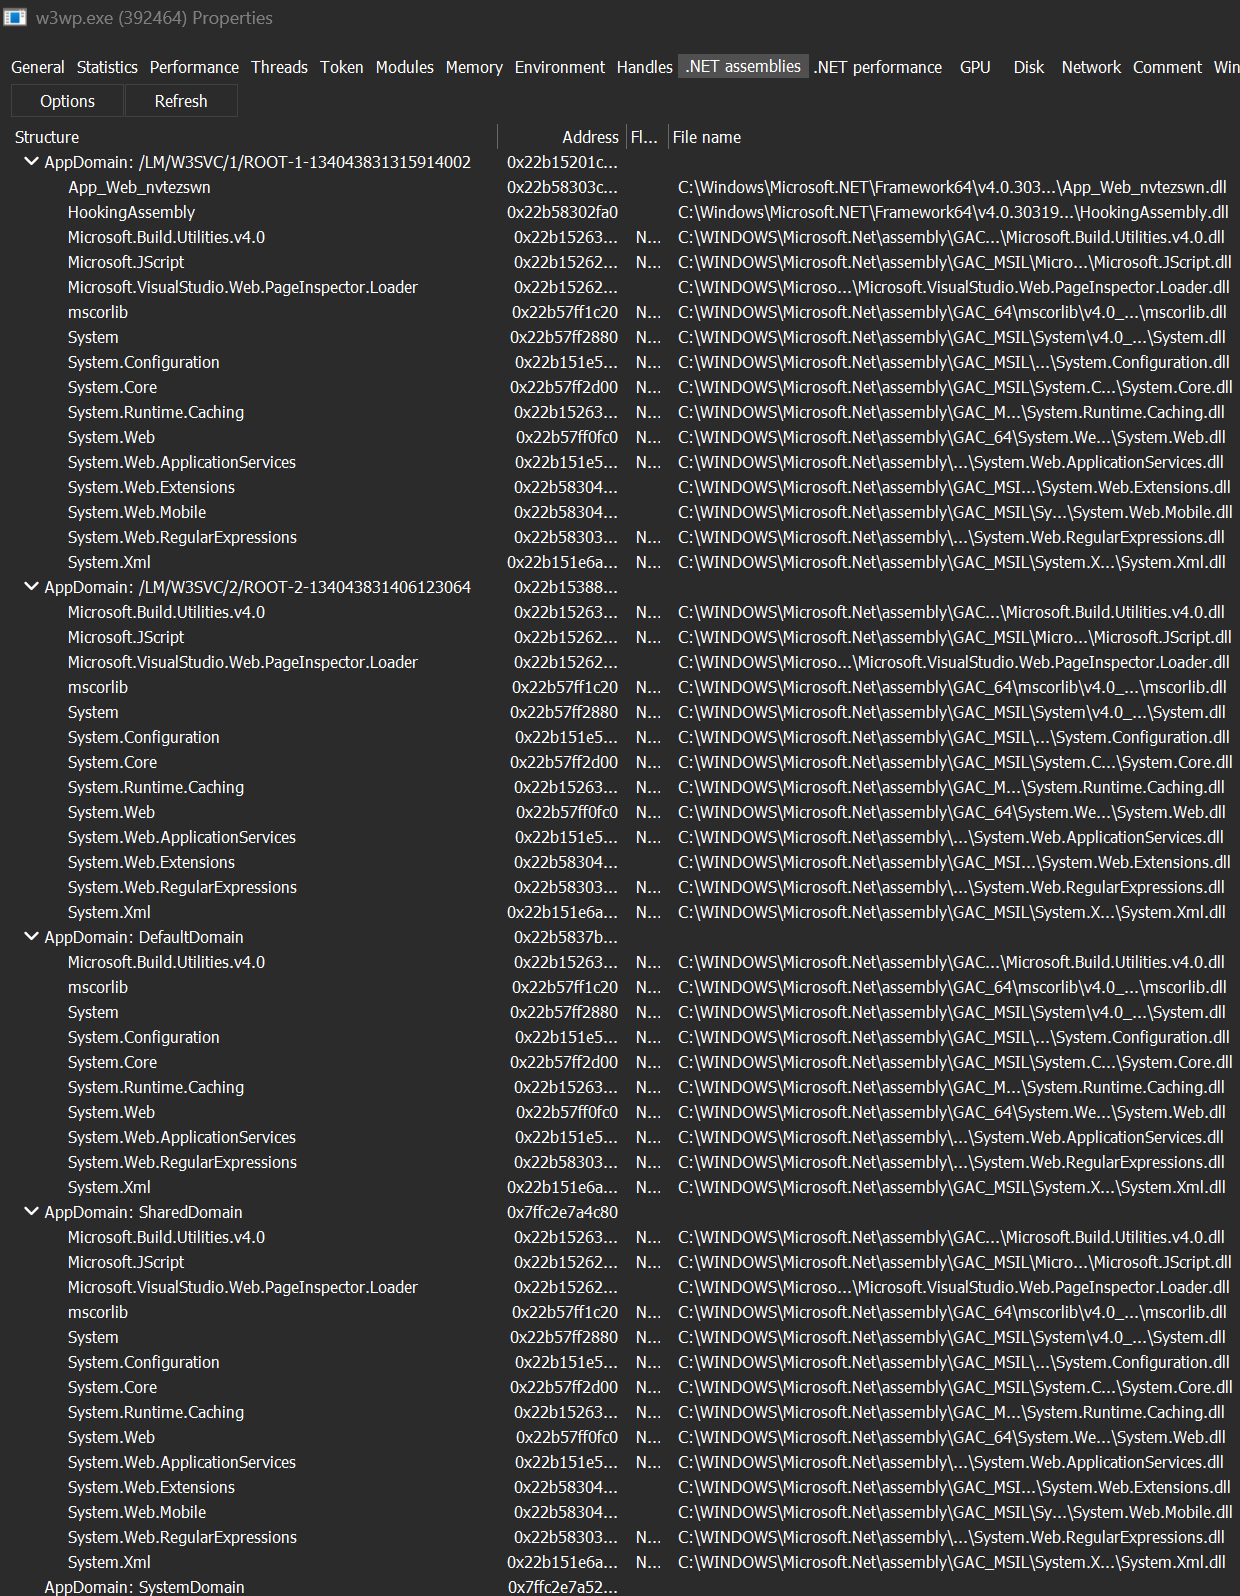
We’ve got 5 application domains present, /LM/W3SVC/1/ROOT-1-134043831315914002 and /LM/W3SVC/2/ROOT-2-134043831406123064 represent the two sites hosted under this worker process (you can see the HookingAssembly loaded into the first site). Other than that we have the default application domain, the shared application domain and a system domain which is empty. The function we just hooked (Assembly.Load) is part of the mscorlib assembly which as you can see, is present in all of the application domains. Unfortunately, if you look address column you can see all of them are located as the same address meaning a single instance of the System assembly is being shared across all application domains.
So why does this matter? Well, when we hooked Assembly.Load we told it the first thing it should do is jump to our Hook function which exists in the HookingAssembly however the HookingAssembly exists in the first application domain meaning if we try to call Assembly.Load from the second app domain, we’ll try to jump to the first application domain which isn’t allowed.
It may be possible to work around this issue but it was starting to feel too unstable and hacky for production use so I decided to move onto the next idea.
Back to Game Mods
After running into the multi application domain issue with manual managed hooks, I decided to give Harmony another try. I’ll keep this section short as its not what I ultimately went with. Harmony did allow me to hook functions across application domains however it was a pretty heavy dependency, requiring multiple .NET assemblies to be loaded into every application domain. I thought about reverse engineering how Harmony works with the plan of implementing my own stripped down version but after being told on the Harmony Discord server that what I was trying to do wasn’t a supported scenario and could very easily cause crashes, I decided to look into alternate issues.
CLR Profiling for Improved Function Visibility
I was running out of options at this stage but before committing to reverse engineering Harmony, I decided to look into CLR profiling which supposedly would allow me to log the parameters being passed to managed functions. After a few hours researching, I was pretty sure what I was attempting was possible although I had no way of knowing if I’d run into the same application domain issue as with my managed hooks, the only way to find out would be to try.
Before we look into the profiler I developed, I’ll briefly cover what a profiler is and how its roughly implemented.
A profiler is a COM DLL which can be loaded by the .NET Common Language Runtime (CLR) and allows us to receive callbacks when certain events occur as part of the CLR’s execution of a .NET application as well as allowing us to configure some aspects of how the CLR operates. A full list of what we can control can be found here. One of the most powerful things a profiler can do is called ReJitting which essentially allows us to mess with the intermediate language (IL) code of a .NET function before its Jitted (compiled) down to native assembly. Using ReJitting, we can instrument any function we want, modifying it to inject things like calls to logging functions. As profilers are controlling certain aspects of the .NET runtime, they cannot be written in a .NET language like C# as the profiler would end up profiling itself. Instead, they must be implemented as a native DLL, typically written in C++. The is a work around of sorts which Kevin Grosse outlines in his blog post ”Writing a .NET profiler in C#” however this involves writing a profiler in .NET, then compiling it to native code which from past experience, results in fairly chunky DLL files. For this post, I’ll be sticking with C++.
Enough of the background, lets get to
Writing a .NET CLR Profiler
This wont be a step by step tutorial on implementing a profiler, instead I’ll be working through the rough flow of implementing a profiler and discussing some of the gotchas I ran into while developing this. Our end goal for this post will be to hook the System.Reflection.Assembly.Load() function so we can log the contents of any reflectively loaded assemblies. The same process can be used to hook just about any function with some minor alterations. The full source code for a working CLR profiler can be found on my GitHub here.
Project Structure
All CLR profilers must implement a version of the ICorProfilerCallback interface, but what is the ICorProfilerCallback interface and how do we decide which version we should use? This all comes down to which versions of the .NET framework we need to support and which features of the CorProfiler interface we want to utilise. The .NET framework, and by extension, the CorProfiller interface, has been around for a long time and has undergone a number of changes as new features have been added, however you can’t just add new functions to an existing interface without breaking all old code implementing said interface. To work around this, .NET has gone with a versioning system for their interfaces. Anytime the .NET developers needed to add new functionality to the ICorProfilerCallback interface, they define a new interface which extended the previous version. ICorProfilerCallback, the original interface which implements the vast majority of functionality, has been around since the .NET Framework 1.0 days. When .NET Framework 2.0 came along, the developers needed to add several new methods to the interface so they defined ICorProfilerCallback2 which extends ICorProfilerCallback meaning to implement the ICorProfilerCallback2 interface, you’d need to implement all of the original methods in the ICorProfilerCallback interfaces along with the new methods added by the ICorProfilerCallback2 interface.
The 10 available interfaces and the functions they provide can be viewed here.
So this brings us back to our original question, how do we decide which version to use? We simply work out the intersection of the earliest version of the .NET Framework we want to support and the functions we need. For todays post we’ll be using ICorProfilerCallback4 which will limit our support to .NET Framework 4.5 or later.
We could drop back to
ICorProfilerCallback3if we really needed to support .NET Framework 4.0 but we can’t go any lower. .NET 4.0+ will refuse to load a profiler if it doesn’t implement at leastICorProfilerCallback3. If we wanted to make a profiler which supported .NET 4.0 and 2.0, extra care would need to be taken.
Now that we’ve selected our interface version, we need to implement it however with close to 100 methods in the interface, this isn’t the funnest process and tends to make your code pretty horrible. To work around this, I created a basic class called BaseProfiler which implements the ICorProfilerCallback4 interface and provides default implementations for all methods:
// Implementation of the ICorProfilerCallback4 profiler API
class BaseProfiler : public ICorProfilerCallback4
{
public:
	BaseProfiler() {}

	// ICorProfilerCallback
	STDMETHODIMP Initialize(IUnknown* pICorProfilerInfoUnk) override { return S_OK; }
	STDMETHODIMP Shutdown() override { return S_OK; }
	STDMETHODIMP AppDomainCreationStarted(AppDomainID appDomainId) override { return S_OK; }
	STDMETHODIMP AppDomainCreationFinished(AppDomainID appDomainId, HRESULT hrStatus) override { return S_OK; }
	STDMETHODIMP AppDomainShutdownStarted(AppDomainID appDomainId) override { return S_OK; }
	STDMETHODIMP AppDomainShutdownFinished(AppDomainID appDomainId, HRESULT hrStatus) override { return S_OK; }
	STDMETHODIMP AssemblyLoadStarted(AssemblyID assemblyId) override { return S_OK; }
	STDMETHODIMP AssemblyLoadFinished(AssemblyID assemblyId, HRESULT hrStatus) override { return S_OK; }
...
}
Then I’ve defined a second profiler class called ZeroedProfiler which extends the BaseProfiler class. In the ZeoredProfiler class I can then override just the functions I’m interested in implementing, keeping my code nice and clean.
QueryInterface
Now that we have the bones of a profiler setup, its time to start implementing the various functions needed to make it work, the first of which is called QueryInterface. QueryInterface will be called multiple times by the CLR when our profiler is first loaded to negotiate the highest version of the ICorProfilerCallback both our profiler and the CLR support. The ordering of this negotiation is a little weird as the CLR will first check that we support version 2 (even though it won’t load our profiler if thats all we support), then versions 5, 4 and 3, stopping whenever it finds a version we support (in our case, version 4).
Initialize
The next function the CLR will call in our profiler is Initalize, passing our profiler an interface we can use to retrieve an object implementing the ICorProfilerInfo interface. This object will act as our bridge back into the CLR and allows us to not only configure portions of the CLR but to query the metadata for just about everything going on inside it.
Using our new CLR bridge, we need to configure an event mask to notify the CLR which events we want to actually receive callbacks for (we really don’t want the CLR sending us absolutely everything).
The mask I’ll be going for looks something like this:
hr = ClrBridge->SetEventMask(
	COR_PRF_MONITOR_MODULE_LOADS |
	COR_PRF_MONITOR_JIT_COMPILATION |
COR_PRF_DISABLE_ALL_NGEN_IMAGES);COR_PRF_MONITOR_MODULE_LOADSwill cause the CLR to call ourModuleLoadFinishedfunction whenever a module as finished loading, allowing us to inject stuff into the module needed for our hookCOR_PRF_MONITOR_JIT_COMPILATIONwill cause the CLR to call ourJITCompilationStartedfunction whenever a function is Jitted, allowing us to modify the IL code before compilation to implement our hookCOR_PRF_DISABLE_ALL_NGEN_IMAGESprevents the CLR from using precompiled .NET libraries The full list of flags can be seen here.
At this point, our profiler is setup and ready to go, all that’s left to do now is wait for the module containing the function we want to hook to be loaded.
ModuleLoadFinished
Every time a module is loaded, our ModuleLoadFinished function will be executed, passing in the ID of the module which was just loaded. The majority of our work will take place in this function.
First up, we need to check to see if the module that was just loaded contains the function we want to hook, in our case the module we are keeping an eye out for is mscorlib.dll which contains the System.Reflection.Assembly class which contains the Load function we want to hook. Unfortunately the ModuleLoadFinished functions doesn’t receive the name of the module loaded, just its identifier. To retrieve the name of the loaded module , we need to request it from the CLR using the CLR bridge object we retrieved in the Initalize function. Once we have the name of the loaded module, we can check to see if it matches the module we are interested in and bail out if it doesn’t.
WCHAR moduleName[300];
ULONG moduleNameLength = 0;
AssemblyID assemblyID;
DWORD moduleFlags;
LPCWSTR TargetModule = L"mscorlib.dll";

// Retrieve the name of the module that just loaded
ClrBridge->GetModuleInfo2(moduleId, nullptr, _countof(moduleName), &moduleNameLength, moduleName, &assemblyID, &moduleFlags);
if (!EndsWith(moduleName, TargetModule))
	return S_OK;
If the module name matches our target module name then its time to get to work!
We’ll start by retrieving two new interfaces from our CLR bridge, a IMetaDataEmit which provides functions for modifying the target modules metadata and a IMetaDataImport which provides functions for interacting with metadata from outside our current module.
IMetaDataEmit* pEmit = nullptr;
IMetaDataImport* pImport = nullptr;

// Retrieve a metadata emitter so we can manipulate the target assembly
{
	COMPtrHolder<IUnknown> pUnk;

	FAIL_CHECK(ClrBridge->GetModuleMetaData(moduleId, ofWrite, IID_IMetaDataEmit, &pUnk), "IID_IMetaDataEmit: GetModuleMetaData failed {} Error: {}", WideToUtf8(TargetModule));
	FAIL_CHECK(pUnk->QueryInterface(IID_IMetaDataEmit, (LPVOID*)&pEmit), "IID_IMetaDataEmit: QueryInterface failed {} Error: {}", WideToUtf8(TargetModule));
	pEmit->AddRef();
}

// Retrieve a metadata importer so we can manipulate the target assembly
{
	COMPtrHolder<IUnknown> pUnk;

	FAIL_CHECK(ClrBridge->GetModuleMetaData(moduleId, ofRead, IID_IMetaDataImport, &pUnk), "IID_IMetaDataImport: GetModuleMetaData failed {}", WideToUtf8(TargetModule));
	FAIL_CHECK(pUnk->QueryInterface(IID_IMetaDataImport, (LPVOID*)&pImport), "IID_IMetaDataImport: QueryInterface failed {}", WideToUtf8(TargetModule));
	pImport->AddRef();
}
Using these two interfaces we’ll need to perform several steps:
- Resolve the signature and token of the function we want to hook
- Define a new type which will hold any managed functions we’ll need
- Define a pinvoke function in our new type
- This function will call a native c++ function which we’ll export from our profiler DLL
- Define a managed function in our new type and set its body (IL code)
- This function will be the target of our hook and will be responsible for calling our pinvoke function, passing in any parameters we want to log
Resolving the token of our target function is fairly straight forward but does take a bit more work than if we were doing so from a managed context via the reflection API.
A function signature is made up of four components:
- The calling convention (i.e. static, instance etc)
- The number of parameters the function takes
- The return type of the function
- The parameters the function takes
If a function only deals with primitive types (int, byte etc) then defining its signature is quite simple however if a function accepts or returns a complex type, we must first resolve this type before constructing our signature. In our case, the function we want to hook is:
public static System.Reflection.Assembly Load(byte[] rawAssembly);The byte array parameter isn’t an issue but the return type of Assembly needs to be resolved before we can define our signature. The code below resolves the System.Reflection.Assembly type, compresses it to a token suitable for usage in a method signature, then constructs a signature for a method which returns an Assembly object and accepts a single parameter of type byte[]:
mdTypeDef typeDef;
HRESULT hr;
std::vector<COR_SIGNATURE> targetMethodSignature;
LPCWSTR TargetClass = L"System.Reflection.Assembly";

BYTE compressedToken[4];
// Resolve Assembly type
FAIL_CHECK(pImport->FindTypeDefByName(TargetClass, mdTypeDefNil, &typeDef), "Failed to find class '{}'. Error: {}", WideToUtf8(TargetClass), HrToString(hr));

ULONG tokenLen = CorSigCompressToken(typeDef, compressedToken);

targetMethodSignature = {
	IMAGE_CEE_CS_CALLCONV_DEFAULT, // Calling convention (DEFAULT = static)
	1,                             // 1 parameter
	ELEMENT_TYPE_CLASS,            // Return type - Class
};

targetMethodSignature.insert(targetMethodSignature.end(), compressedToken, compressedToken + tokenLen);
targetMethodSignature.push_back(ELEMENT_TYPE_SZARRAY);// parameter type: byte[]
targetMethodSignature.push_back(ELEMENT_TYPE_U1);     // array element type = byte
With the signature setup, we can resolve our target method:
mdTypeDef typeDef;
LPCWSTR TargetClass = L"System.Reflection.Assembly";
LPCWSTR TargetMethod = L"Load";

spdlog::debug("Looking for class {}", WideToUtf8(TargetClass));
FAIL_CHECK(pImport->FindTypeDefByName(TargetClass, mdTypeDefNil, &typeDef), "Failed to find class '{}'", WideToUtf8(TargetClass));

spdlog::debug("Found class, looking for method {}", WideToUtf8(TargetMethod));

FAIL_CHECK(pImport->FindMethod(typeDef, TargetMethod, targetMethodSignature.data(), targetMethodSignature.size(), mdTarget), "FindMethod with signature failed for {}.{}", WideToUtf8(TargetClass), WideToUtf8(TargetMethod));

spdlog::debug("Found {} - {}.{}", WideToUtf8(TargetModule), WideToUtf8(TargetClass), WideToUtf8(TargetMethod));
The above code resolves our target class (System.Reflection.Assembly), then resolves our target method (Load) within that class, using the method signature we just defined to ensure the correct method is resolved. Technically for the Assembly.Load function, defining the function signature is optional as there’s only one Assembly.Load function (i.e. we don’t need to differentiate between multiple functions with the same name but different parameters) however I think its good practice to explicitly resolve the function we are interested in. That’s it for our function resolution, we’ll be using the value we resolved later on to rewrite our target functions IL code before its Jitted.
Next on our todo list is defining our own type to house our methods and injecting it into our target module.
You can technically skip this step and just inject your hook functions into any old type within your target module (mscorlib in our case) but in practice this is quite messy, prone to updates breaking your code and is difficult to work with hooking multiple functions in multiple types.
The type I’ll be defining will be the equivalent of this:
public sealed abstract class ZeroedProfilerType {}sealed prevents our class from being extended whilst abstract prevents our class from being instantiated, effectively defining a class which can only house static functions. One last thing I need to note before jumping back into the code is the type our new type extends. We haven’t explicitly defined a type to extend so our new type will inherently extend the System.Object type.
To represent the above type, we can do the following to first resolve the System.Object type, then define a new type extending it.
// Retrieve a reference to System.Object so we can configure our new type to extend it
mdTypeRef systemObjectRef = mdTypeRefNil;
LPCWSTR TypeName = L"ZeroedProfilerType";
pEmit->DefineTypeRefByName(moduleId, L"System.Object", &systemObjectRef);

// Define a new type so we have somewhere to safely store all our methods
pEmit->DefineTypeDef(TypeName, tdSealed | tdAbstract | tdPublic, systemObjectRef, nullptr, tdInjectedType);
With our new type defined we can now add any custom managed functions our hooks may require. We wont be needing any today but it can be handy for retrieving information about, say, the current IIS request when hooking a function running in the context of an IIS server.
Next, we need to define a reference to our native DLL. We’ll be using this in a second to define a p/invoke from our hook out to our native logging function. Make sure the ModuleName lines up with the name of your profiler DLL.
mdModuleRef mrZeroedProfilerReference;
LPCWSTR ModuleName = L"ZeroedProfiler";
pEmit->DefineModuleRef(ModuleName, &mrZeroedProfilerReference);
Now that we have a reference to our native DLL defined, we can add our p/invoke function. The p/invoke function we’ll be defining is the equivalent of this:
[DllImport("ZeroedProfiler"), CallingConvention = CallingConvention.StdCall)]
public static extern void AssemblyLoadHook(byte* data, int size);
Once again we need to define a function signature, this time of the function we’ll be defining. Our function will accept two parameters, one of type byte* (a pointer to a byte array) and the other of type int, and return a void type. Why can’t we just pass the byte[] object we’ll be receiving from Assembly.Load(byte[] asm)? Because only primitive types can cross the managed=>native boundary and whilst byte[] may look like a primitive type, its actually syntactic sugar around an object of type System.Array<System.Byte>. To work around this, we’ll instead need to grab a reference to the byte[]’s internal data pointer along with its length, then pass this over to the native side and handle it appropriately.
std::vector<COR_SIGNATURE> pInvokeSignature = {
    IMAGE_CEE_CS_CALLCONV_DEFAULT,     // Calling convention (DEFAULT = static)
    2,                                 // 2 inputs
    ELEMENT_TYPE_VOID,                 // No return
    ELEMENT_TYPE_PTR, ELEMENT_TYPE_U1, // Byte array pointer,
    ELEMENT_TYPE_I4                    // Byte array length
};
Then, we can define our p/invoke method:
LPCWSTR CallbackMethodName = L"AssemblyLoadHook";

pEmit->DefineMethod(tdInjectedType,
	CallbackMethodName,
	~mdAbstract & (mdStatic | mdPublic | mdPinvokeImpl),
	pInvokeSignature.data(),
	pInvokeSignature.size(),
	0,
	miPreserveSig,
	&pInvokeMethod);

pEmit->DefinePinvokeMap(pInvokeMethod, pmCallConvStdcall | pmNoMangle, CallbackMethodName, mrZeroedProfilerReference);
With our p/invoke function defined, we’re almost done with ModuleLoadFinished, all that’s left to do is define a managed function which can be called from Assembly.Load (via an IL rewrite). This managed function will be responsible for converting the byte[] received from Assembly.Load into a byte* and int combination before calling the p/invoke function we just defined. The equivalent of what we’ll be defining is:
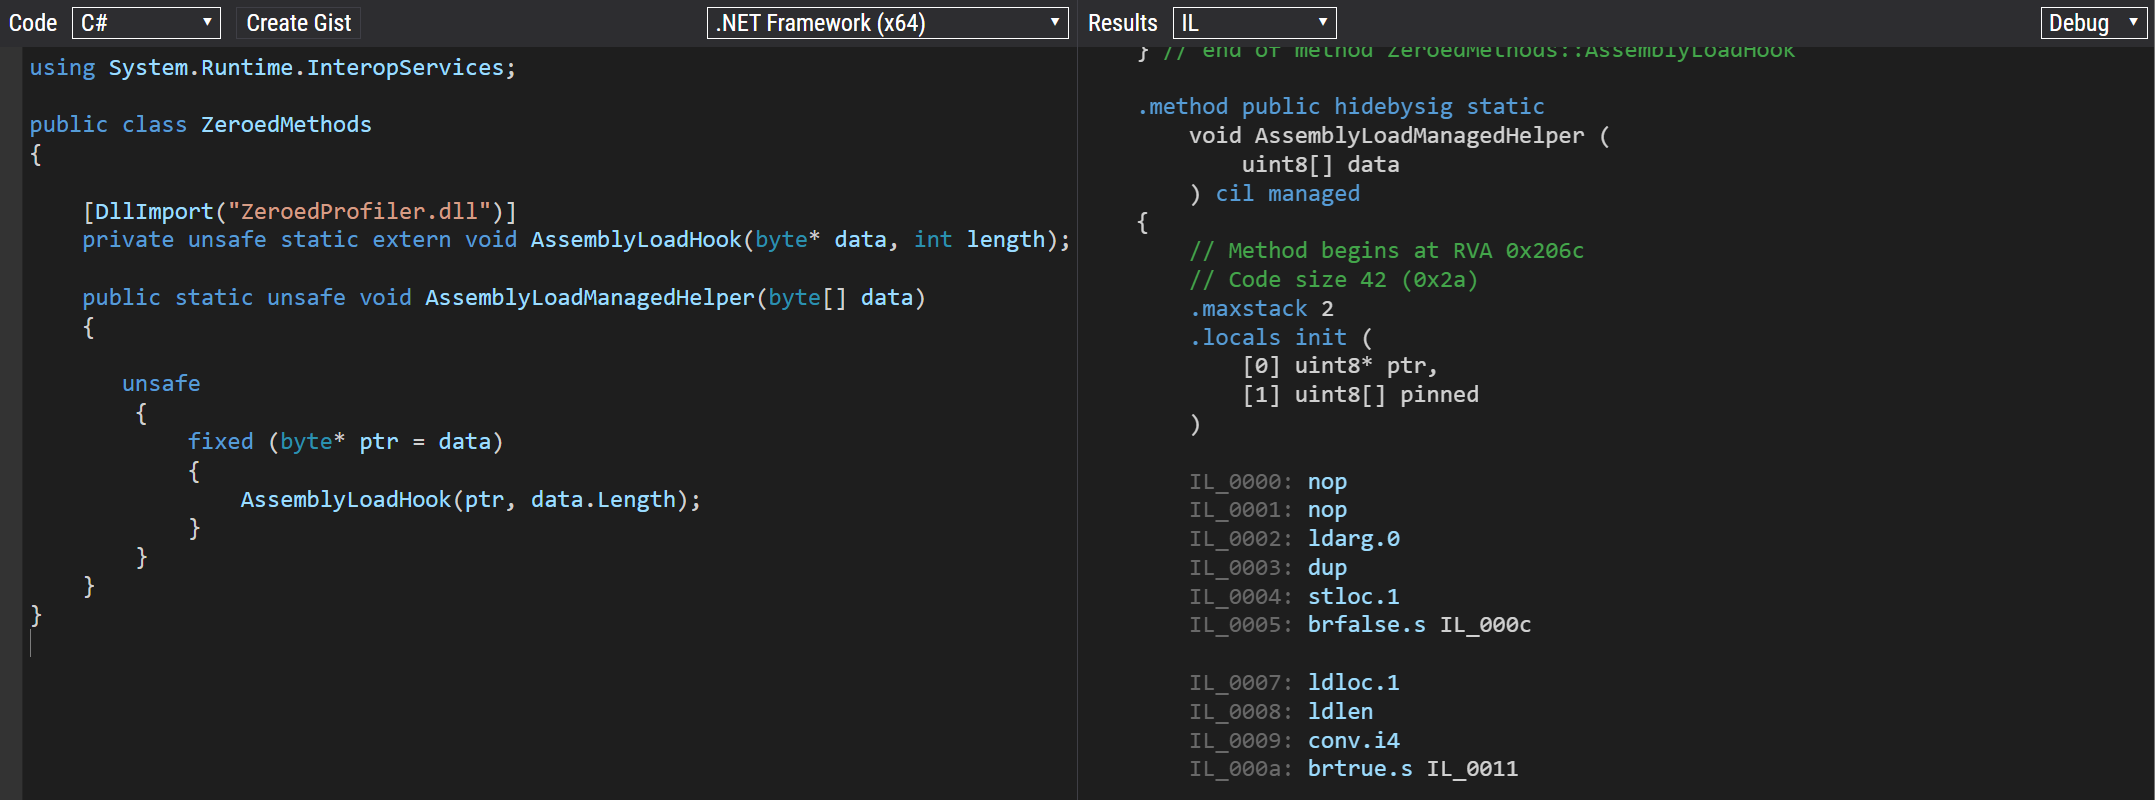
public static unsafe void AssemblyLoadManagedHelper(byte[] data)
{
   unsafe
	{
		fixed (byte* ptr = data)
		{
			AssemblyLoadHook(ptr, data.Length);
		}
	}
}
Most of the code below is very similar to our p/invoke defining code above, we are defining a new function which accepts one parameter of type byte[] and returns void:
LPCWSTR ManagedHelperName = L"AssemblyLoadManagedHelper";

std::vector<COR_SIGNATURE> managedHelperSignature = {
    IMAGE_CEE_CS_CALLCONV_DEFAULT,        // Calling convention (DEFAULT = static)
    1,                                    // 1 inputs
    ELEMENT_TYPE_VOID,                    // No return
    ELEMENT_TYPE_SZARRAY, ELEMENT_TYPE_U1 // Byte array
};

pEmit->DefineMethod(td,
	ManagedHelperName,
	mdStatic | mdPublic,
	managedHelperSignature.data(),
	managedHelperSignature.size(),
	0,
	miIL | miNoInlining,
	&managedHelperMethod);
The above code will define a valid method however if we leave things as is, any attempts to call our function will result in an exception like this:
System.MethodAccessException: Attempt by security transparent method 'ZeroedProfilerType.AssemblyLoadManagedHelper(Byte[])' to call native code through method 'ZeroedProfilerType.AssemblyLoadHook(Byte*, Int32)' failed.  Methods must be security critical or security safe-critical to call native code.
   at ZeroedProfilerType.AssemblyLoadManagedHelper(Byte[] )
   at System.Reflection.Assembly.Load(Byte[] rawAssembly)
To fix this, we’ll need to add the SecuritySafeCritical attribute to our method (something the C# compiler would normally do for us). The below code should look fairly similar to what we’ve already covered. All we’re doing is retrieving a reference to the System.Security.SecuritySafeCriticalAttribute type (which is the fully qualified name of the SecuritySafeCritical attribute), defining a signature and using it to resolve the constructor for the SecuritySafeCriticalAttribute type, then passing the resolved constructor and our newly defined method to the DefineCustomAttribute function to wire everything up.
// Resolve SecuritySafeCriticalAttribute type
mdTypeDef tdSafeCritical;
mdMethodDef mdSafeCritical = mdMethodDefNil;
pImport->FindTypeDefByName(L"System.Security.SecuritySafeCriticalAttribute", mdTokenNil, &tdSafeCritical);

COR_SIGNATURE sigSafeCriticalCtor[] = {
	IMAGE_CEE_CS_CALLCONV_HASTHIS,
	0x00,                               // Number of arguments
	ELEMENT_TYPE_VOID,                  // Return type
};

pImport->FindMember(tdSafeCritical, L".ctor", sigSafeCriticalCtor, sizeof(sigSafeCriticalCtor), &mdSafeCritical);

// Attach SecuritySafeCriticalAttribute attribute to target method
mdToken tkCustomAttribute;
pEmit->DefineCustomAttribute(managedHelperMethod, mdSafeCritical, NULL, 0, &tkCustomAttribute);
We’ve defined our new function but it doesn’t do anything yet as it doesn’t have a body. If we left things as is, we’d get a crash like this:
System.TypeLoadException: Could not load type 'ZeroedProfilerType' from assembly 'mscorlib, Version=4.0.0.0, Culture=neutral, PublicKeyToken=b77a5c561934e089' because the method 'AssemblyLoadManagedHelper' has no implementation (no RVA).
   at System.Reflection.Assembly.Load(Byte[] rawAssembly)
If you’ll recall, the function we are defining should replicate this:
public static unsafe void AssemblyLoadManagedHelper(byte[] data)
{
   unsafe
	{
		fixed (byte* ptr = data)
		{
			AssemblyLoadHook(ptr, data.Length);
		}
	}
}
Which doesn’t look so bad, there’s only one line of code. Unfortunately when this is compiled the IL code generated is the equivalent of this:
public unsafe static void AssemblyLoadManagedHelper(byte[] data)
{
	fixed (byte[] array = data)
	{
		byte* ptr;
		if (data == null || array.Length == 0)
		{
			ptr = null;
		}
		else
		{
			ptr = &array[0];
		}
		ZeroedMethods.AssemblyLoadHook(ptr, data.Length);
	}
}
Ok, that’s a tad more complex but its still not too bad. Unfortunately, we don’t get the luxury of working with C# code when defining the body of our method, we need to work with IL code which looks more like this:
.method public hidebysig static
	void AssemblyLoadManagedHelper (
		uint8[] data
	) cil managed
{
	// Header Size: 12 bytes
	// Code Size: 36 (0x24) bytes
	// LocalVarSig Token: 0x11000002 RID: 2
	.maxstack 2
	.locals init (
		[0] uint8* ptr,
		[1] uint8[] pinned
	)

	/* 0x000002B8 02           */ IL_0000: ldarg.0
	/* 0x000002B9 25           */ IL_0001: dup
	/* 0x000002BA 0B           */ IL_0002: stloc.1

	//         if (data == null || array.Length == 0)

	/* 0x000002BB 2C05         */ IL_0003: brfalse.s IL_000A

	/* 0x000002BD 07           */ IL_0005: ldloc.1
	/* 0x000002BE 8E           */ IL_0006: ldlen
	/* 0x000002BF 69           */ IL_0007: conv.i4
	/* 0x000002C0 2D05         */ IL_0008: brtrue.s  IL_000F

	//             ptr = null;

	/* 0x000002C2 16           */ IL_000A: ldc.i4.0
	/* 0x000002C3 E0           */ IL_000B: conv.u
	/* 0x000002C4 0A           */ IL_000C: stloc.0
	/* 0x000002C5 2B09         */ IL_000D: br.s      IL_0018


	//             ptr = &array[0];

	/* 0x000002C7 07           */ IL_000F: ldloc.1
	/* 0x000002C8 16           */ IL_0010: ldc.i4.0
	/* 0x000002C9 8F1A000001   */ IL_0011: ldelema   [mscorlib]System.Byte
	/* 0x000002CE E0           */ IL_0016: conv.u
	/* 0x000002CF 0A           */ IL_0017: stloc.0


	//         ZeroedMethods.AssemblyLoadHook(ptr, data.Length);

	/* 0x000002D0 06           */ IL_0018: ldloc.0
	/* 0x000002D1 02           */ IL_0019: ldarg.0
	/* 0x000002D2 8E           */ IL_001A: ldlen
	/* 0x000002D3 69           */ IL_001B: conv.i4
	/* 0x000002D4 2801000006   */ IL_001C: call      void ZeroedMethods::AssemblyLoadHook(uint8*, int32)

	/* 0x000002D9 14           */ IL_0021: ldnull
	/* 0x000002DA 0B           */ IL_0022: stloc.1

	// }

	/* 0x000002DB 2A           */ IL_0023: ret
} // end of method ZeroedMethods::AssemblyLoadManagedHelper
Ok, that’s looking pretty nasty but there’s only 25 instructions so it shouldn’t take too long to implement, right?
Unfortunately there’s a few additional steps we’ll need to undertake to implement the above IL into our profiler, namely resolving all types and methods needed (in this case, System.Byte and ZeroedMethods.AssemblyLoadHook), defining our functions local variable signature and ensuring all branch targets are wired up correctly.
We’ll start by defining our local variable signature and setting up our IL rewriter:
std::vector<COR_SIGNATURE> localSig = {
  IMAGE_CEE_CS_CALLCONV_LOCAL_SIG,      // SIG_LOCAL_SIG
  0x02,                                 // Max stack size
  ELEMENT_TYPE_PTR, ELEMENT_TYPE_U1,    // System.Byte*
  ELEMENT_TYPE_PINNED,                  // Prevent GC/moving of value
  ELEMENT_TYPE_SZARRAY, ELEMENT_TYPE_U1 // System.Byte[]
};

mdSignature tkLocalSig = mdTokenNil;
pEmit->GetTokenFromSig(localSig.data(), (ULONG)localSig.size(), &tkLocalSig);

ILRewriter rewriter(ClrBridge, NULL, ModuleId, managedHelperMethod);
rewriter.Initialize(tkLocalSig);
We’re getting deep into the guts of what makes up a .NET function now, this signature contains quite a bit of information about our method:
IMAGE_CEE_CS_CALLCONV_LOCAL_SIGindicates this signature outlines our functions local variables0x02is the maximum stack size (i.e. the max number of room needed for all the local variables our method will need)ELEMENT_TYPE_PTR, ELEMENT_TYPE_U1defines the first local variable, a pointer to a byte arrayELEMENT_TYPE_PINNED, ELEMENT_TYPE_SZARRAY, ELEMENT_TYPE_U1defines the second local variable, a byte array which will be pinned for the life of this function, ensuring it wont be moved around by the garbage collector
Pinning the second local variable is important as the pointer we’ll pass to our C++ code later on will be a pointer into this byte array so we don’t want it moving on us
This signature is the equivalent of the following which can be seen in the IL dump above:
.maxstack 2
.locals init (
	[0] uint8* ptr,
	[1] uint8[] pinned
)
Once we’ve defined our signature, we can initialise the ILRewriter. I wont be getting into how the ILRewriter works, the version I’ve included in the demo project is a (heavily) modified version of Microsoft’s sample from their clrprofiler repo (the changes are mainly removing code I didn’t need and refactoring to allow us to manually inject our own IL into our target function). We’re finally ready to add IL to our function body:
mdTypeDef tdBytes = mdTypeDefNil;
// Resolve System.Byte
pImport->FindTypeDefByName(L"System.Byte", mdTypeDefNil, &tdBytes);
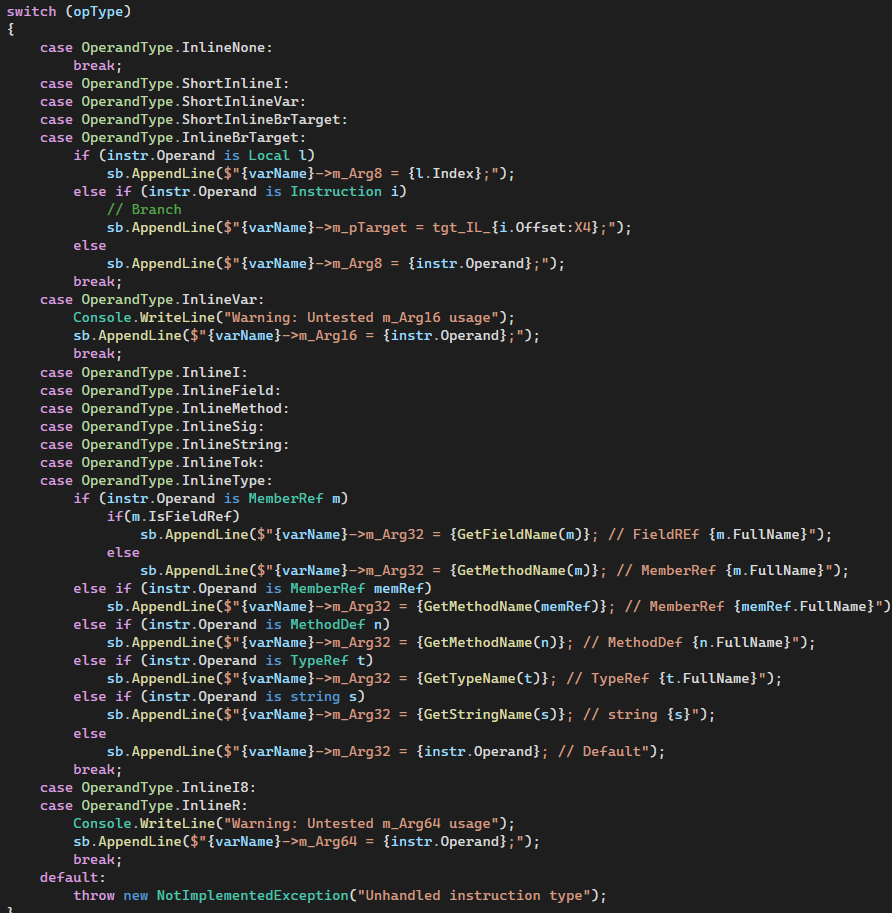
ILInstr* pFirstOriginalInstr = rewriter.GetILList()->m_pNext;
// Predefine jump targets so we can reference them whenever
ILInstr* tgt_IL_000C = rewriter.NewILInstr();
ILInstr* tgt_IL_0011 = rewriter.NewILInstr();
ILInstr* tgt_IL_001A = rewriter.NewILInstr();
// 0000: nop
ILInstr* IL_0000 = rewriter.NewILInstr();
IL_0000->m_opcode = CEE_NOP;
rewriter.InsertBefore(pFirstOriginalInstr, IL_0000);
// 0005: brfalse.s IL_000C: ldc.i4.0
ILInstr* IL_0005 = rewriter.NewILInstr();
IL_0005->m_opcode = CEE_BRFALSE_S;
IL_0005->m_pTarget = tgt_IL_000C;
rewriter.InsertBefore(pFirstOriginalInstr, IL_0005);
// 001F: call System.Void ZeroedMethods::AssemblyLoadHook(System.Byte*,System.Int32)
ILInstr* IL_001F = rewriter.NewILInstr();
IL_001F->m_opcode = CEE_CALL;
IL_001F->m_Arg32 = pInvokeMethod; // MethodDef System.Void ZeroedMethods::AssemblyLoadHook(System.Byte*,System.Int32)
rewriter.InsertBefore(pFirstOriginalInstr, IL_001F);The above code is pretty nasty and is only a portion of what’s required to represent our function (see the github repo for the full function) but lets go through it.
We start out with some familiar code which resolves the System.Byte type which we’ll need later on in our function.
Next, we retrieve a reference to the “first instruction” of our function (essentially the start of the doubly linked list we’ll be using to represent out functions IL) which will be used as a marker for the end of our function so we can insert new instructions easily.
We then predefine several instructions which represent the branch targets for our function (i.e. the instruction we’ll end up at should a branch condition evaluate to true). By predefining these, we can reference them in a branch instruction, even if the branch would jump to a portion of the function we haven’t defined yet.
After that I’ve included a collection of instruction definitions to give you an idea of how they are defined, first we have a nop, next we have a brfalse (branch if false) instruction with a target of one of our predefined instructions, and finally we have a call to our p/invoke method we defined earlier.
Again, this is just a portion of the instructions needed to recreate our function (the actual code is a few hundred lines long) so be sure to checkout the repo if you’re interested.
Before we move on, I wanted to address how this code was written. Obviously writing this by hand would be an absolute nightmare, so what are our options? When I first started out I was using https://sharplab.io/ to write C# code, then taking the IL from the right and dropping that into Microsoft Co-pilot in Visual Studio and asking it to generate the equivalent C++ code (this was running in the context of my project so it knew the structure I was after).
This sort of worked but the code that was generated would quite often have subtle bugs that forced me to go line by line through the IL to identify what had gone wrong. For a function with 25 lines of IL, this was manageable but as I scaled my project up and needed to handle more (and larger) functions, it quickly became a massive pain in the ass.
My current approach (which was used to generate the code used in this post) was to write all the functions I want to reimplement in IL into a C# library and compile this to a DLL. Next, I wrote a C# application which uses dnlib to decompile this DLL back to IL, then iterate over each instruction and output the equivalent C++.
This code generator is still very much a work in progress and is heavily geared towards my main project so I wont be releasing it at this stage but writing something similar isn’t overly difficult, its just a lot of trial and error.
We’re finally done with ModuleLoadFinished, next up
JITCompilationStarted
JITCompilationStarted is called when a Just In Time (JIT) compilation has commenced, passing us the ID of the function about to be compiled. We have one job in JITCompilationStarted, keep an eye out for the function ID of the function we want to hook (which we resolved earlier). When we see our function of interest being compiled we need to import that function’s existing IL, inject a call to our hook function at the beginning, reexport the function then allow the compilation process to continue.
We’ll start off with ensuring the function being jitted is our function of interest by resolving the function’s class, module and method definition before comparing them against our target module and method.
HRESULT ZeroedProfiler::JITCompilationStarted(FunctionID functionID, BOOL fIsSafeToBlock)
{
	mdToken methodDef;
	ClassID classID;
	ModuleID moduleID;

	ClrBridge->GetFunctionInfo(functionID, &classID, &moduleID, &methodDef);

	if (moduleID == ModuleId && methodDef == targetMethodDef) {
		RewriteIL(moduleID, methodDef);
	}
}
Then, all we need to do is inject a call to our hook method. We’ll setup an ILRewriter and wrap our method of interest (which should be Assembly.Load) before importing it. Our ILRewriter should now contain all of the IL instructions of our target method.
We’ll then inject two new IL instructions, the first will push the first local variable onto the evaluation stack, passing it as a parameter to the upcoming function call (this parameter should be the raw .NET assembly about to be loaded), the second instruction will call our hook function.
After that, we just need to reexport our modified IL before returning, allowing the JITter to resume.
HRESULT ZeroedProfiler::RewriteIL(ModuleID moduleID, mdMethodDef methodDef)
{
	// Import function into ILRewriter
	ILRewriter* rewriter = new ILRewriter(ClrBridge, NULL, moduleID, methodDef);

	rewriter->Initialize();
	rewriter->Import();

	ILInstr* pFirstOriginalInstr = rewriter->GetILList()->m_pNext;
	ILInstr* pNewInstr = NULL;

	// Create and insert new instruction the first local variable onto the evaluation stack (pass as a parameter)
	pNewInstr = rewriter->NewILInstr();
	pNewInstr->m_opcode = CEE_LDARG_0;
	rewriter->InsertBefore(pFirstOriginalInstr, pNewInstr);

	// Create and insert new instruction to call our hook function
	pNewInstr = rewriter->NewILInstr();
	pNewInstr->m_opcode = CEE_CALL;
	pNewInstr->m_Arg32 = managedHelperMethod;
	rewriter->InsertBefore(pFirstOriginalInstr, pNewInstr);

	// Reexport our modified function
	FAIL_CHECK(rewriter->Export(), "Failed to export modified IL");

	return S_OK;
}
And that’s it, if everything goes well, we should have hooked the Assembly.Load function! We are missing one thing though, we defined our p/invoke function earlier but we never wrote the native function which will be called. Thankfully this is nice and easy.
This function will receive a pointer to a byte array and the length of said array which can be used together to extract and log the byte array data.
extern "C" void STDAPICALLTYPE AssemblyLoadHook(byte* rawAssembly, int assemblyLength)
{
	std::ostringstream oss;
	for (int i = 0; i < assemblyLength; ++i) {
		oss << std::hex << std::setw(2) << std::setfill('0') << static_cast<int>(rawAssembly[i]);
	}
	spdlog::info("[AssembyLoad] Bytes: {}", oss.str());
}
All we need to do now is build our profiler and take note of where our DLL ended up.
Registering a .NET profiler
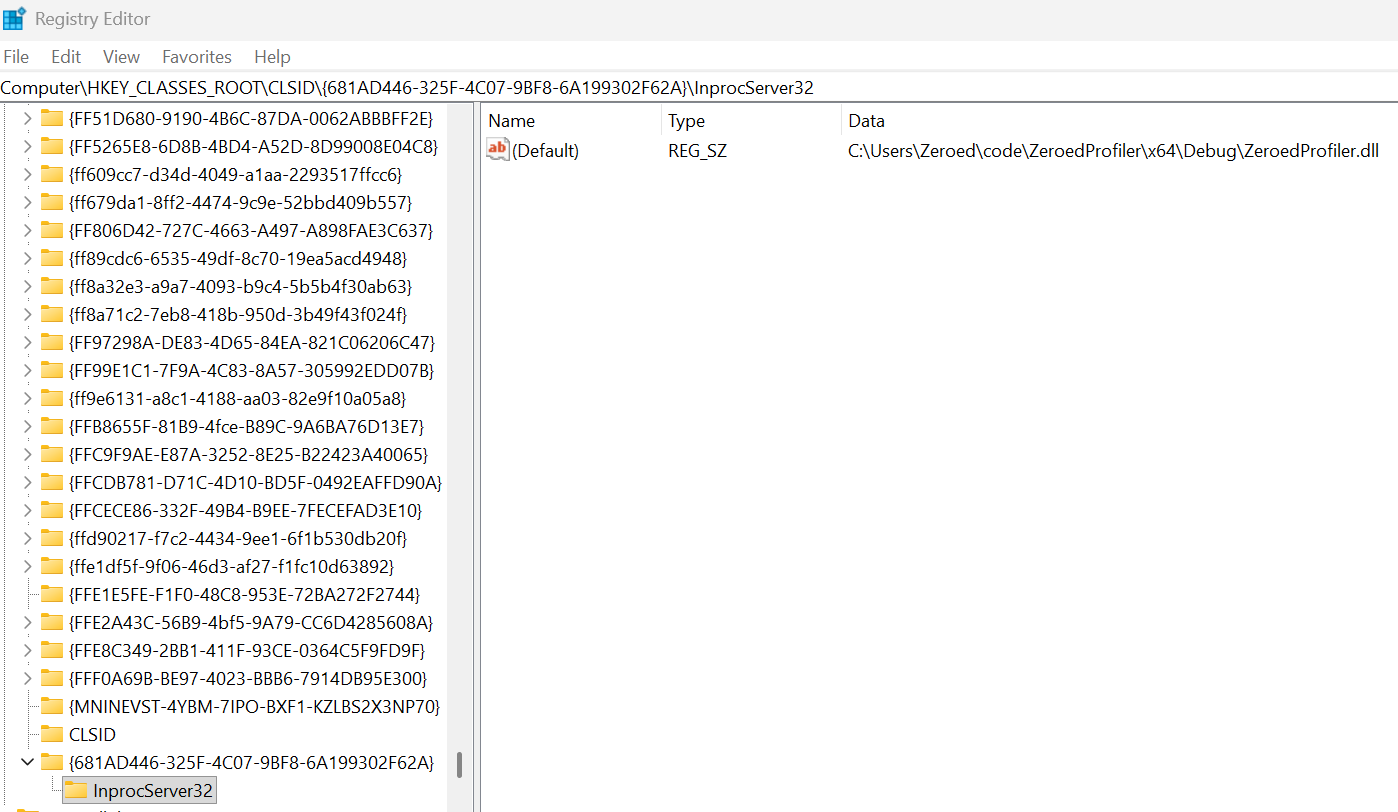
Before we can use our profiler, we’ll need to register it on our system and configure .NET to use it. Registering a profiler involves creating a new registry key under HKEY_CLASSES_ROOT\CLSID\{681AD446-325F-4C07-9BF8-6A199302F62A}\InprocServer32 where the GUID portion of this key matches the GUID defined in ZeroedProfiler.h (feel free to regenerate this GUID, it has no special meaning but it must be unique on your system and the same in the registry and your profiler.)
Under this key you’ll need to set the (Default) value to the path of your profiler.
Lastly, we need to set two environment variables to enable profiling, one to enable it and one to specify the GUID of the profiler you wish to use. While testing your profiler, I highly recommend setting this in an individual terminal session rather than system wide:
$env:COR_ENABLE_PROFILING=1
$env:COR_PROFILER="{681AD446-325F-4C07-9BF8-6A199302F62A}"
Setting these in a PowerShell session will cause our profiler to be used for any .NET Framework applications executed within that session.
All that’s left to do now is run a .NET application which loads an assembly via Assembly.Load I’ll be using a simple application which attempts to reflectively load itself
using System.IO;
using System.Reflection;

namespace ConsoleApp2
{
    internal class Program
    {
        static void Main(string[] args)
        {
            Assembly.Load(File.ReadAllBytes("C:\Users\Zeroed\code\ConsoleApp2\bin\x64\Debug\ConsoleApp2.exe"));
        }
    }
}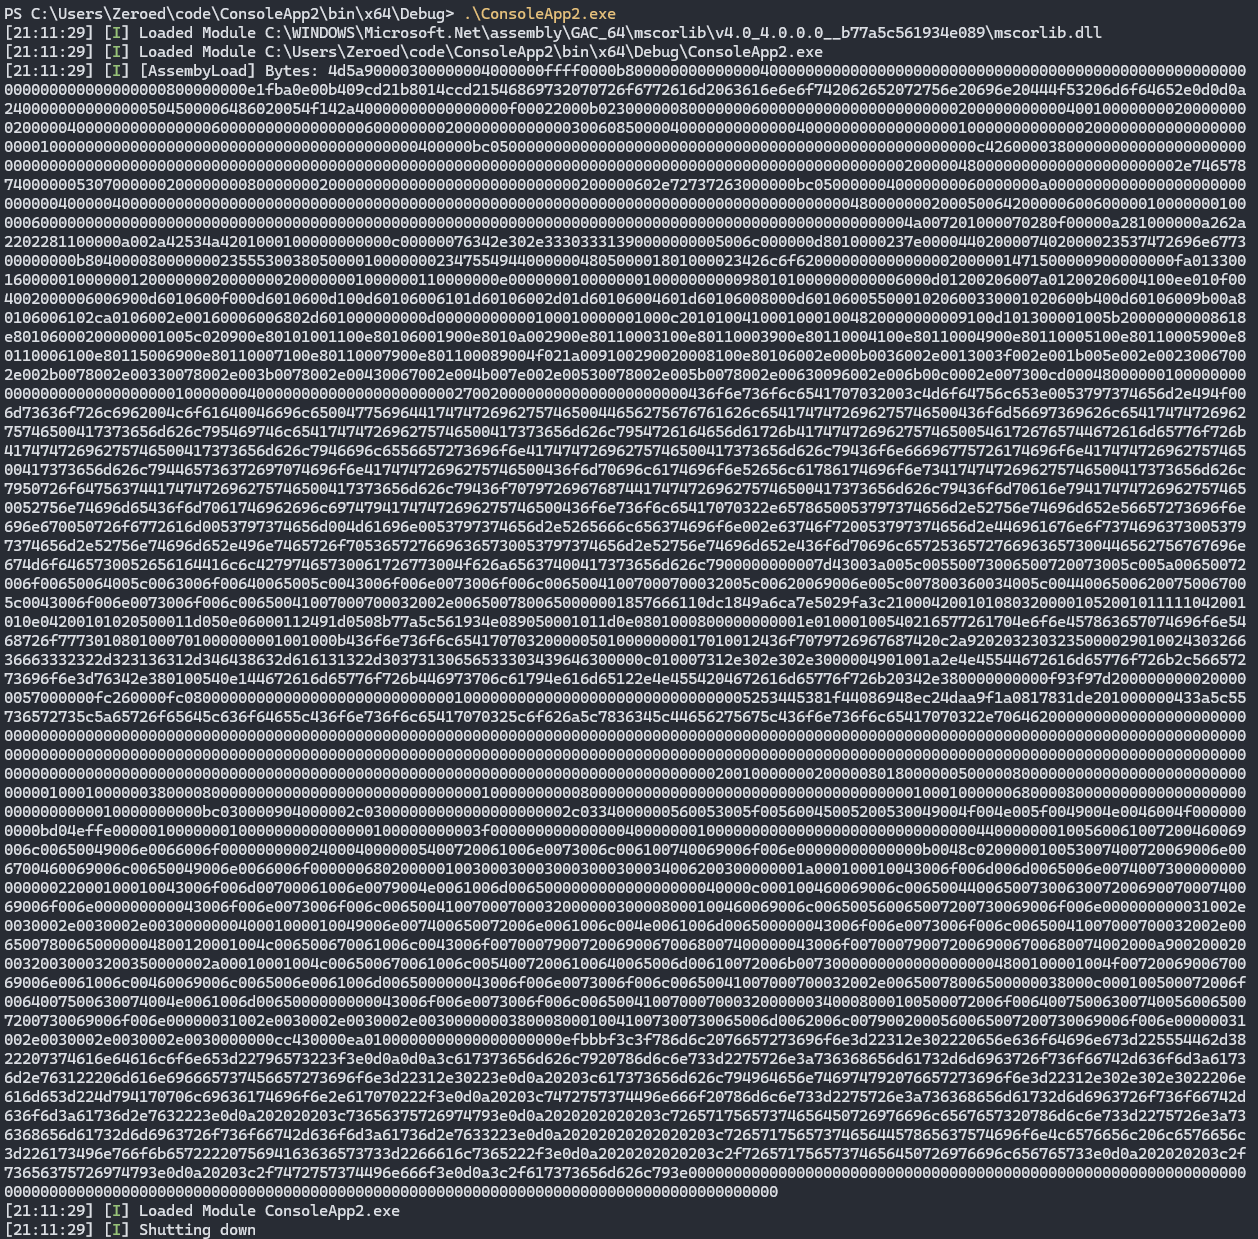
Beautiful, we got some logging showing us all the modules that were loaded, then we got our raw assembly bytes. If we want to confirm the data is what we expect we can drop it into something like cyber chef.
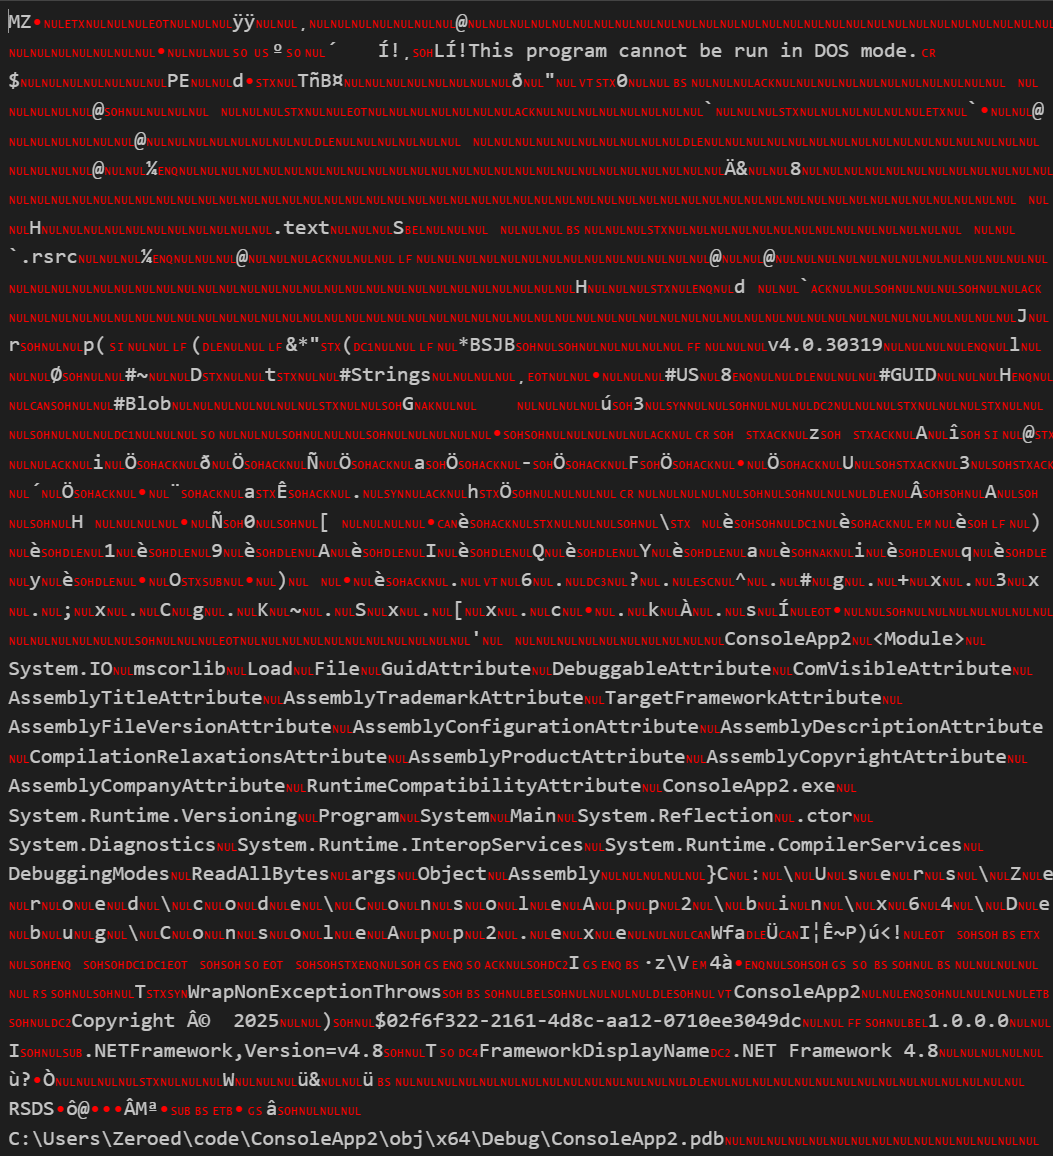
Looks pretty good to me!
Loading a profiler under IIS
The goal of this whole exercise was to gain visibility of certain functions being executed under IIS so lets hook our profiler up to IIS and see if it a) works, and b) can handle multiple application domains.
To enable our profiler, we’ll need to set the COR_ENABLE_PROFILING and COR_PROFILER environment variables at the application pool level. There doesn’t appear to be a way of configuring environment variables via the IIS manager GUI so instead we’ll have to manually edit one of IIS’ config files, C:\WINDOWS\System32\Inetsrv\Config\ApplicationHost.config
<add name="Default" autoStart="true" startMode="AlwaysRunning">
...
<environmentVariables>
<add name="COR_ENABLE_PROFILING" value="1" />
<add name="COR_PROFILER" value="{681AD446-325F-4C07-9BF8-6A199302F62A}" />
</environmentVariables>
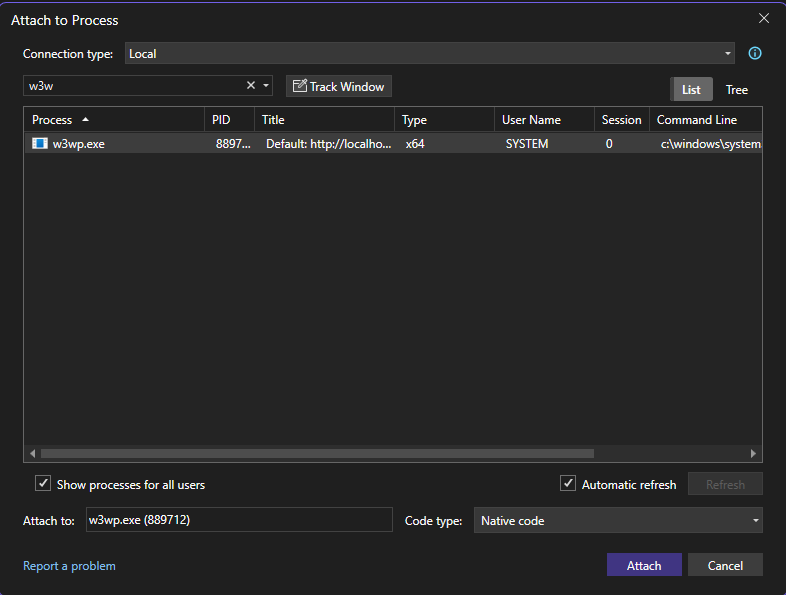
</add>That’s it, IIS has been setup to use our profiler, but how do we get our output? Our profiler is currently writing to standard out so the only way we’ll be able to see our output is to attach a debugger to IIS. Doing so is pretty easy, just fire up Visual Studio as an admin then attach to w3wp.exe.
Now we just need to reflectively load a .NET assembly via a webshell by repeating the process from earlier in this post:
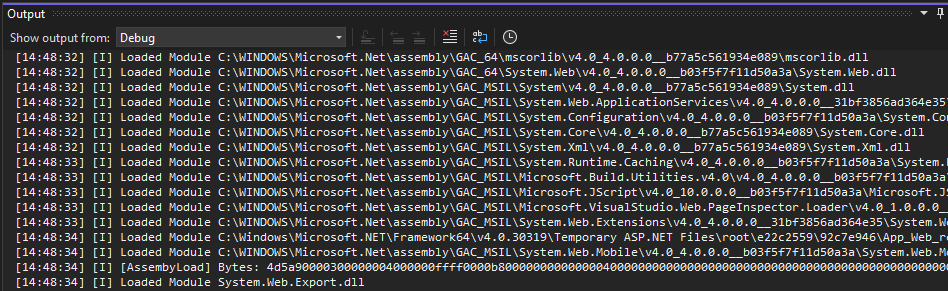
As soon as we load our assembly, heaps of modules are loaded (most are being loaded due to IIS servicing its first request), then towards the bottom we get what we’re after: [AssembyLoad] Bytes: 4d5a90000300000.... Perfect, we managed to capture an assembly load under IIS. Our next test is to ensure we can load an assembly under a different application domain without everything exploding.

We can see a new module being loaded (which is our web shell being compiled for our new application domain) followed by another assembly being logged meaning we’ve successfully hooked a function in a way which works across application domains!
Wrapping up
This post is already massive and there’s still quite a few topics we could cover including how to inject full managed functions which retrieve the current IIS context to extract information about the current request and working with exceptions (which is way harder than it sounds). But all of that will have to wait until next time. The full code for the profiler discussed in this post is available on my GitHub repo https://github.com/zeroed-tech/Zeroed-Profiler